** CAUTION NERD ALERT **
I have been working on a problem at work to add a list of updates required to be installed on our servers to my daily Powershell check script I have which runs each day. All the examples I had found online featured the script running a query against the WSUS server. I found this to a bit cumbersome for what I needed and it generally only gave me part of the picture required.
So instead I discovered that the windowsupdate.log file is in fact a tab separated file and with Powershell v2 you can easily import this. Once imported I rearranged to sort the newest lines first and then parse it to find the lines showing which updates are waiting.
I then strip those lines to get only the GUID for the update and query this against a WSUS server. This method seems to run fairly swiftly and quite well across WAN links.
If you want to use it just change the editable section at the top. Of course the script could be incorporated into a bigger script checking more than one computer. This is what it does in my daily server check.
I have also uploaded it to the TechNet Script Center Repository.
###
### Script to check WSUS updates to be installed on a given computer.
###
### Author: NomadTales
### Email: nomadtales [at] gmail [dot] com
### Twitter: @NomadTales
### Date: 16 Sept 2010
###
### License: Creative Commons Attribution-NonCommercial 3.0 Unported License
### LicenseURL: http://creativecommons.org/licenses/by-nc/3.0/
###
### The script parses the WindowsUpdate.log file to get a list of update GUIDs,
### then checks those GUIDs against the WSUS server. This method seems more
### acurate and simpler than polling the WSUS server directly.
###
### Please note there are probably better ways at scripting the string handling section.
### Let me know if so.
###
### Start editable section ###
$computer = "computer" # The computer to check updates on
$systemdrv = "C" # The System Drive
$windowsdir = "windows" # The System Folder
$WSUSserver = "wsusserver" # Your WSUS server
$WSUSserverportnum = "80" # WSUS server port number
$wsusSSL = $false # WSUS using SSL, if yes use $true
### End editable section ###
### START SCRIPT ###
## Reset variables - handy if you run the script multiple times from the editor
$updatesrequired = $null
$updates = $null
$updatelist = $null
$updatecount = 0
## Connect to the WSUS server
[reflection.assembly]::LoadWithPartialName("Microsoft.UpdateServices.Administration") | out-null
$wsus = [Microsoft.UpdateServices.Administration.AdminProxy]::getUpdateServer($WSUSserver,$wsusSSL,$WSUSserverportnum)
## Generate the path of the log file
$winupdatelog = "\\" + $computer + "\" + $systemdrv + "$\" + $windowsdir + "\windowsupdate.log"
## Import the log file and change the sorting to make newest first
$updates = import-csv $winupdatelog -delimiter `t -header "Date", "Time", "Code1", "Code2", "Action", "Description" `
| sort @{Expression="Date";Descending=$true}, @{Expression="Time";Descending=$true}
## Parse the log file for the update GUID and query the WSUS server for the human friendly title
foreach ($update in $updates)
{
if ($update.description -match "Added update {")
{
$updatecount++
$updateidtemp = $update.description -replace ".*{"
$updateid = $updateidtemp -replace "}.*"
$updatesrequired = $wsus.GetUpdate([guid]$updateid)
$updatelist += "{0}`n" -f $updatesrequired.title
}
if ($update.description -match "## START ## AU: Search for updates") {break}
}
## Add a total number of updates to the bottom
$updatelist += "`n"
$updatelist += "Total updates to install - {0}" -f $updatecount
## Display the updates required
$updatelist
### END SCRIPT ###
Thursday, September 16, 2010
Saturday, July 31, 2010
TV-B-Gone inside an iPod
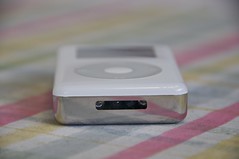
A couple of weeks ago I got myself a TV-B-Gone kit. This is after months of wanting one. Once received I pulled out the soldering iron that had laid unused for years and constructed the simple circuitry. Completed I just didn't like it being so .. exposed.
It needed a case. And not some ordinary case, it needed some sort of disguising case. This after all is a covert piece of equipment. So I pulled out my old iPod Photo, which after a great life had also sat around collecting dust.

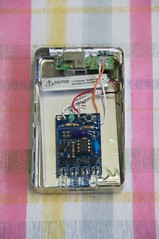
Once apart and gutted I set about trying to see if the kit would fit. It was satisfying to see that the cable bay at the bottom was perfectly suited as a slot for the IR LEDs.
After experimenting with the iPod Photo's battery connected to the kit I instead tested an older original iPod battery. This worked great.
The only thing to do now was to try and rig up some sort of button. I originally thought about using the main command button on the front of the unit but, after checking the circuitry, found it would be too hard to connect up to so instead changed my focus on using the hold button on the top.
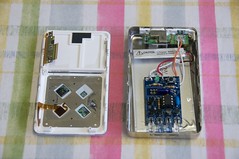
Wired up with the help of a mate who had a better soldering iron and soldering skills, we had our disguised TV-B-Gone working. All that is needed now is to wear your headphones and wander into any electronics store or mall filled with annoying and power hungry TVs.
A demo of it in action ..
It needed a case. And not some ordinary case, it needed some sort of disguising case. This after all is a covert piece of equipment. So I pulled out my old iPod Photo, which after a great life had also sat around collecting dust.
Once apart and gutted I set about trying to see if the kit would fit. It was satisfying to see that the cable bay at the bottom was perfectly suited as a slot for the IR LEDs.
After experimenting with the iPod Photo's battery connected to the kit I instead tested an older original iPod battery. This worked great.
The only thing to do now was to try and rig up some sort of button. I originally thought about using the main command button on the front of the unit but, after checking the circuitry, found it would be too hard to connect up to so instead changed my focus on using the hold button on the top.
Wired up with the help of a mate who had a better soldering iron and soldering skills, we had our disguised TV-B-Gone working. All that is needed now is to wear your headphones and wander into any electronics store or mall filled with annoying and power hungry TVs.
A demo of it in action ..
Wednesday, September 16, 2009
Malvern Star Single Speed conversion - Part 6
OK as always you think you have finished something - not that I know that feeling very often - and then there are always more tweaks to perform. For the Single Speed conversion the majority of the recent tweaking has been on the handlebars.
The old handlebars that I had upside down - which looked kinda weird but actually wasn't too bad a position - were out. As I discussed in Part 5 I had ordered some track style handlebars and they had arrived during the week.
Straight away after the tight fit to install the new bars on the head stem I noticed an issue that was not discernible beforehand, the bars were slightly thicker than the 22mm of the previous one. The 1mm or so difference in size made it impossible without some modification to fit the old brake levers I am currently using.

There was also the problem of where to put the brake levers. The shape meant that they would have to be mounted near the centre at the head stem. I am not too keen on this as I like brakes to be in easy reach so I can stop suddenly if needed, without having to switch my hand position.
The track bars were unfortunately not going to work, so I pulled them out and will probably flog off on Ebay one day. Back on went the old bars until I worked out something else to use.
The something else came the next day when I revisited the handlebars I had on another secondhand bike I had picked up off Freecycle. The frame on the bike was crap and the bars I never liked because they were just too wide - almost 670mm. But now with another look I realised that if I chopped off 5cm off each end I would have enough space for the grips and the old levers. So that is what I did.
A hacksaw was used and 5cm lopped off and then with the bars installed it gave the bike a completely new look. It is a look that I like. The bars won't go completely horizontal and they have a slight upward slant but this has the added benefit that I can now flip the bike upside down and stand it. Good for working on the under carriage.


The new bars meant my front brake cable was slightly too long, so it also meant a small job to chop 10cm off the length to get it looking correct. This gave me the chance to lubricate the cable at the same time with some WD40 which I hadn't done before.
Apart from the bars the only other thing that has kept me busy has been the lefthand crank which has decided to be a bit troublesome. Without an 8mm allen key to fit I had been bodging it with a smaller one and a screw driver, the lug just kept loosening off though. So it was a trip around to the brother-in-laws to get the right size and fix this.
And the final touches were added over the weekend when I went down to the helpful LBS and got myself a bell for free. They just happened to have a box out the back full of them and gave it away.
The commute has taken on a new style and the Malvern Star has its very own spot to ride the trains to and fro work.

Tuesday, September 08, 2009
Malvern Star Single Speed conversion - Part 5
After the disaster in Part 4 of not being able to get tyres on the weekend the first chance I got I popped into the LBS handily located across the road from work. With my small shopping list I ended up walking out paying far more than I thought I would for the rest of the bits I needed to finish off this project - new pedals, a seat, brake shoes and those tyres.

It was an eager me when I got home. Straight out to the shed to get this project finished. I was very keen to get on and start riding and the finish line was well and truly in sight.
My first task was to get those tyres on the rims. I put the tubes in the tyres and using tyre levers worked the tight tyres over the edge. It wasn't that easy, as you almost need three hands, but with a bit of patience they went on without trouble. I gave some air to the tubes, with the semi-useless hand pump that I had, just to give it some sort of rigidity but would have to a better job of that later.
With both wheels out of the way I turned my attention to saddle. I whipped off the old tatty BMX seat and installed the new one on the stem. I then put the new pedals on the cranks and bolted the cranks onto the bottom bracket. The bike was looking the real deal but the details needed finishing.

The old BMX seat is beyond repair
The major detail which needed doing was the rear brake. The one I stole from the SunTour bike was set up to be connected in reverse to the way I wanted to use it. This shouldn't have been a problem to change except cable connector wasn't designed to be removed. In the end I had to grind off the cable connector and install, after drilling the hole bigger, the one from the Malvern Star.
The brake shoes, which always take a little bit of time to adjust, went on and then it was a quick trip in the car down to the service station to properly inflate my wheels. As I am only familiar with the normal car type tube valves a little lesson was learned about Presta type valves in the process of inflating them. They don't have a built in spring so they won't return a reading on the gauge.
I was blowing up the tyres trying to see the pressure and then realised that they were already well and truly inflated. They needed to be around 100psi, so I just had to guesstimate it.
When I got back it was time to cook dinner so I would have to wait a little bit longer to take out the steed. But it wasn't long after sustenance that I was putting the last finishing touch to the machine - the chain.
The chain I had was a dedicated BMX single-speed chain, which can accommodate the slightly larger teeth of the sprockets. To get the right length, I only needed in the end, to take two links out.
With the chain installed the bike was ready. Even though it was almost 9 at night I couldn't wait to test ride. I maneuvered the incredibly lighter machine out to the street and took off around the nearby carpark. I have to say it was an incredible sensation. The bike was ultra quiet and seemed to just glide along. I was not going to miss the gears at all.
It is now a day later and I have fine tuned the bike to suit my size and taken it out on a long ride around town. It is almost perfect. Almost because I have ordered new drop track-style handlebars .. and I will wait to pass judgment to see if the new bars make it special.
I now have what I wanted from the beginning, the perfect very light weight commuter bike to take on the train each day .. and an early birthday present.


continued in the final Part 6 ...
Sunday, September 06, 2009
Malvern Star Single Speed conversion - Part 4
Things are taking shape in the project. After getting excited with the new parts that I arrived in Part 3 the majority of the tale since has been taken up with detailing - and there has been plenty to do.
First things first and I needed to fix the front forks so that the wheel axle fitted into the slots. I sent a text to my brother-in-law and I was kindly allowed to borrow his grinder. Once I had this in hand it was a simple 5 minutes job to make the slots slightly bigger to make them fit.
Then I was back on the frame to make it look like the real deal. I returned to cleaning up the rust patches and making the chrome bits shine. I partially followed the advice of a detailing expert except that for the rust i just went straight to the sandpaper and sanded back to bare metal. Ideally one day I will respray the entire frame but at the moment I like the old colour and the "Malvern Star" stickers.

Once the frame was in a state that I thought was reasonable it was time to make it ready to travel. This involved giving it a couple of all over sprays with a clear enamel coating. The clothes line came in handy for this job.

Now that the frame was ready it was time to focus my attention on the old handle bars and head stem. Using that detailing advice I used steal wool and WD40 to clean up the chrome parts and make it shine. I was surprised by how successful this was.
By the time I got back to it the frame had well and truly dried so it was time to reattach the front fork. I cleaned up the bearing housing and repacked with plenty of grease and screwed it all back together. Then attached the old - now gleaming - head stem and handle bars. This time though instead of the old upright position I flipped the handle bars over and had them facing down.
Next up I was installing the front brakes and lever. The old brakes from the Malvern wouldn't do though. They were just too rusted to clean up. So luckily I was able to scavenge an almost exact pair off an old SunTour bike that used to belong to my sister - well, it still officially does belong to her, but she hasn't used it in about 20 years.

I was once again getting excited and decided to put the wheels on to see what it looked liked. I liked what I saw.

The weekend wasn't entirely successful though. And the major disappointment of the last two days has been that I was unable to get any tyres. I went down to the bike shop on Saturday morning prepared to depart with cash to get some rubber only to be told they had one wheel of the size - 700x28 - I wanted.
One wheel is not much good so I resolved to check out, for the first time, the only other bike shop in town. Unfortunately by the time I got there they were closed and not to be opened until Monday. I would just have to put my desire to ride the new machine until I could get the tyres during the working week.
By the end of the weekend I had done as much as I could. I had stolen the other brake from the SunTour and tried out my seat options from my spare parts - none of which I am happy about. So with just a bit of shopping to do I can see the finish line approaching now.
continued in Part 5 ...
Thursday, September 03, 2009
Malvern Star Single Speed conversion - Part 3
Developments have occurred since Part 2 of the tale of the Malvern Star conversion. Two boxes of parts arrived from Melbourne.
There is always something magical about getting a parcel in the mail. Even better when you don't expect it and there they are, two large boxes waiting when you walk in home after work.

I hastily opened and spilled out the contents of nuts, small boxes, bubble wrapped silver objects and of course two large bicycle wheels. The wheels were amazing and seemed almost weightless to lift. I put them aside as I unwrapped the cranks and chainring and started to bolt them together.
I skipped dinner as I got the frame and made sure the bottom bracket screwed in and fitted - it did. I attached the cranks and laid out the bike on the floor with the rear wheel attached and the front wheel roughly where it should go. It all looked very nice.

One small problem though that I found with the new parts is that the front wheel axle doesn't fit into the slot on the front fork. It seems to be less than a mm out. Nothing though that a quick angle grind can't fix.
Also in my haste to check out all the bits I still have not completed a fundamental job - cleaning up and detailing the frame. I have started, by sanding out some of the rust patches, but still have a little way to go.
I have at this stage still decided to keep the original paintwork and just sand out the rust and clear coat it all with an enamel spray. So my eager work attaching the cranks and bottom bracket will have to be removed. But it was worth it.

continued in Part 4 ...
Friday, August 28, 2009
Malvern Star Single Speed conversion - Part 2
Well I have been busy being Mr Bike Mechanic lately working on my little project to convert that free 80s Malvern Star into a sweet single speed commuter bike. So after the original pickup of the bike as described in Part 1 I have set about getting the parts I need to get it converted.
One thing is for sure, it is not that cheap to buy new bike parts in Australia. God knows how you can buy a brand new decent bike from a bike store for around $300 when the basic parts I am looking at are tallying up way above that. Perhaps the words "China" and "import" have something to do with it.
Anyway, I decided after visiting my LBSs (local bike shops) - one in Maitland and then another two in Newcastle - that they are not really versed in the single speed thing like they are down south. So I weighed up a few options, I could get the parts I needed off the net - which would be a risk as I am not exactly sure which part will fit with my frame and I don't want to order in the wrong part. Alternatively I could work with someone who does a lot of these conversions and get them to organise the parts for me.
And this is what I did. I shot an email off to Pony Bikes and asked them how hard it was to get the bits I needed.
Not long later I recieved a quick reply. Pony B was onto the case and she drew up a list of parts and costed them. It wasn't going to be very cheap so I restricted myself to just getting the drive train parts .. the wheels, hubs, bottom bracket, chainring and cranks. The other bits I could scrounge myself. But I knew that if I was getting someone who new the game, I would be making sure that the parts I get will be the right size and fit my Malvern.
This involved a bit of measuring, so I had strip back the frame to just itself. I had removed everything bar the cranks, chainring and bottom bracket previously but now I needed to get rid of them. So instead as suggested I go off to the LBS (local bike shop) I went around to the brother-in-laws and got myself a 14mm socket and whipped off the cranks .. with plenty of persuasion using a screwdriver and hammer.
I then worked on the bottom bracket. I didn't have the required C spanner, so again the screwdriver and hammer came to the fore and tap-tap-tap later one half was off and then tap-tap-tap to get the other one came off. I took a photo of the bottom bracket minus everything and sent it off to Pony B.

The bottom bracket measurement

Making sure the frame will fit the rear hub
She confirmed that she had the right parts gave me the final price - $600 including shipping. I could almost buy a new single-speed for that! But I was commited now and this I had decided would be my birthday present to myself (by the time I finish this project it probably will be my birthday).
So I am now paid up and just waiting for the parts to arrive.
continued in Part 3 ...
One thing is for sure, it is not that cheap to buy new bike parts in Australia. God knows how you can buy a brand new decent bike from a bike store for around $300 when the basic parts I am looking at are tallying up way above that. Perhaps the words "China" and "import" have something to do with it.
Anyway, I decided after visiting my LBSs (local bike shops) - one in Maitland and then another two in Newcastle - that they are not really versed in the single speed thing like they are down south. So I weighed up a few options, I could get the parts I needed off the net - which would be a risk as I am not exactly sure which part will fit with my frame and I don't want to order in the wrong part. Alternatively I could work with someone who does a lot of these conversions and get them to organise the parts for me.
And this is what I did. I shot an email off to Pony Bikes and asked them how hard it was to get the bits I needed.
hi pony b,
i got this malvern star for free! a "touristar" from early-mid 80s i guess. am keen to jazz it up a bit but keep the original paintwork. unfortunately i am not in melburn, tho lived there for a couple of years and was into the ss/fixie look but never got around to getting one myself. now that i have the star i want to get serious. i stripped it back to the frame and just need the parts.
could you do a quote of parts list of what would look good - maybe with a chrome look - and how much to ship up to Maitland NSW. let me know if you need measurments.
thanks,
j
Not long later I recieved a quick reply. Pony B was onto the case and she drew up a list of parts and costed them. It wasn't going to be very cheap so I restricted myself to just getting the drive train parts .. the wheels, hubs, bottom bracket, chainring and cranks. The other bits I could scrounge myself. But I knew that if I was getting someone who new the game, I would be making sure that the parts I get will be the right size and fit my Malvern.
This involved a bit of measuring, so I had strip back the frame to just itself. I had removed everything bar the cranks, chainring and bottom bracket previously but now I needed to get rid of them. So instead as suggested I go off to the LBS (local bike shop) I went around to the brother-in-laws and got myself a 14mm socket and whipped off the cranks .. with plenty of persuasion using a screwdriver and hammer.
I then worked on the bottom bracket. I didn't have the required C spanner, so again the screwdriver and hammer came to the fore and tap-tap-tap later one half was off and then tap-tap-tap to get the other one came off. I took a photo of the bottom bracket minus everything and sent it off to Pony B.

The bottom bracket measurement

Making sure the frame will fit the rear hub
She confirmed that she had the right parts gave me the final price - $600 including shipping. I could almost buy a new single-speed for that! But I was commited now and this I had decided would be my birthday present to myself (by the time I finish this project it probably will be my birthday).
So I am now paid up and just waiting for the parts to arrive.
continued in Part 3 ...
Monday, August 24, 2009
My current Idea - a new Cross Harbour Tunnel
In the SMH on Saturday they highlighted their new backing of a Public Transport Enquiry. All grandiose sounding, but the intention is good. They want to take action where successive state governments stretching back before I was born have done nothing.
Of course it could – well most probably will - be a bunch of hot air, but it brought back thoughts I have had for a while, which were reinforced as I spent a few weeks commuting from Wynyard to Chatswood. Obviously there needs to be extra lines across the harbour - 2 tracks on the bridge supporting all those services is not feasible. So I thought why don't they instead utilise the spur line from Waverton down to Lavender Bay, and go underground under the harbour at Blues Point?
This then connects to the new development at Barangaroo. From there the line continues underground to a new station, either at the end of Market Street to connect Darling Harbour or it goes to the new planned "Sydney Square" across the street from the Town Hall - after they demolish the buildings currently there. From there it will connect up with the vacant stations at Central and off on its merry way into the Cityrail network.
Alternatively, I have also considered that this could be part of a line that connects the beaches - the Northern Beaches to Maroubra. Utilising the empty platforms at St Leonards a line dips underground there running north and heads off to Dee Why or somewhere - my geography of the Northern Beaches is sketchy. At the same time, after the new Town Hall station it continues on under Oxford Street to a new station at Taylor Square and then on to Moore Park - for the stadiums obviously - then to UniNSW and continuing to Maroubra.
See my little mock up below.
Now all I have to do is tell the Public Inquiry, they tell the government and it gets built. Too easy.
Saturday, August 22, 2009
Malvern Star Single Speed conversion - Part 1
Been a while since I have updated this blog. There have been no trips to report of, so instead I have been making myself busy up in the home region. Part of this has been a recent obsession with making myself a Single-Speed bicycle. Courier style. It's all the rage down in Melbourne. I was all keen to just go out and buy one. I had my eyes - still have my eyes - on a Trek Soho S, but then I thought a cheaper option would be to build one from an old road bike frame.
The problem. I didn't have an old road bike frame. I didn't let this stop me so I went on to Freecycle to see if any localsuckers kind people would give away their old bike hanging up in their shed.
Message pleads:
Lo and behold only a few hours after sending it out, I get a response.
Scant info to go by but it sounds good. An old Malvern Star, they were, I thought, the bees knees when I was a kid. I gave them a ring and we arranged to pick up on the weekend.


Fast forward to Sunday and cruising over to the suburbs I was making my acquaintance with possibly a new friend for life. And he was good looking. Apart from the tyre sidewalls that looked like they had a horrid skin disease, the bike could have been ridden away. The tyres still had pressure. The philanthropist showed me that the headset bearings were grinding, but as I discovered later this was not because of a busted bearing, but because someone had put in the bearing cages upside-down.
Love at first sight. This Freecycle malarkey is bloody brilliant.
The bike was just what I wanted. The frame is right size and design and best of all the bike has horizontal dropouts (see image below) which is precisely what is needed for single-speed/fixie convert.

All I have to do now is strip it back to the frame and buy the required parts.
continued in Part 2 ...
The problem. I didn't have an old road bike frame. I didn't let this stop me so I went on to Freecycle to see if any local
Message pleads:
Hi all,
I have a dream of building a fixie bike and to get me started I need a basic old road bike frame. It doesn't matter if the frame is half buried under rubbish and the wheels are rusted and tyres rotten, as I just want the basic frame.
Lo and behold only a few hours after sending it out, I get a response.
Hi, we have an old Malvern Star pushbike if you are interested.
Scant info to go by but it sounds good. An old Malvern Star, they were, I thought, the bees knees when I was a kid. I gave them a ring and we arranged to pick up on the weekend.


Fast forward to Sunday and cruising over to the suburbs I was making my acquaintance with possibly a new friend for life. And he was good looking. Apart from the tyre sidewalls that looked like they had a horrid skin disease, the bike could have been ridden away. The tyres still had pressure. The philanthropist showed me that the headset bearings were grinding, but as I discovered later this was not because of a busted bearing, but because someone had put in the bearing cages upside-down.
Love at first sight. This Freecycle malarkey is bloody brilliant.
The bike was just what I wanted. The frame is right size and design and best of all the bike has horizontal dropouts (see image below) which is precisely what is needed for single-speed/fixie convert.

All I have to do now is strip it back to the frame and buy the required parts.
continued in Part 2 ...
Tuesday, November 18, 2008
Boulders, Blue Wash and a Bond Film
JAISALMER: It seems like an age ago that we were in Mysore, where I posted the last lame blog story, but it has just been three weeks. Since that time we have come a bloody long way again, clocking up more miles on the train and bus than I care to calculate (yet). We have also had some varied standout and forgettable moments from getting a new travel companion and seeing more amazing sights and scenery to having to put up with polluted, rubbish filled cities and battle touts and other pests (including an audacious autorickshaw driver who chased us done a lane trying to take us to a commission paying hotel).
Mysore was a standout town for us and India; it was actually fairly clean and livable. There were large boulevards to walk down and a brilliant market to explore, and then there was its fabulous palace, built only a hundred years ago, but quite impressive. After trying to sneak in with our camera (they were banned) we joined the hundreds of locals in marveling at its magnificent rooms.
Our time in Mysore also coincided with the start of the India's major festival period; Diwali, the festival of lights. We have since christened it the never-ending Diwali as it has followed us like that autorickshaw. The festival would be great if it was just the fireworks but as it turns out it also involves kids igniting fire crackers - the exploding, banging kind.
There doesn't seem to be any regulation on the size of bang either. Sitting and trying to have an evening meal while an explosion rocks you and the buildings around is not much fun – especially in a country that has active terrorism. But that is just a minor complaint and since Mysore the sights we have seen more than make up for the long travel or kids risking their fingers.
Firstly there was Hampi a boulder strewn region that once contained a capital city of an abandoned empire. The inhabitants were prodigious carvers and with the masses of material scattered around turned it all into an amazing rock city. Wandering around giant boulders to the forgotten temples and bazaars was one of the highlights for our trip in the south. Seeing as we almost did not have time to get there the experience was doubly magical.
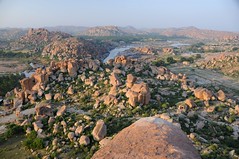
Boulder strewn Hampi
Hampi was a highlight, so was Mysore, and then there was Bombay, our next stop. We came all the way from the south, clocking up those kilometres, to the big financial smokey town to meet Rob's sister. She had come all the way from Oz to meet us (bless her, someone who actually wants to travel with us for a month). We were going further north to where we hadn't been yet (it still hard to believe how big and varied this country is) and she was happily coming along for the ride.
The colonial architecture of the graceful buildings and busy bustling thoroughfares of Mumbai was our first shared experience. Unfortunately for me it was tainted by the expense of the place and is now also viewed through a bed bug riddled prism. Due to the cost of getting a room we ended up crashing at the cheapest place we found, the Salvos. God bless them, they provide cheapish rooms but they also came with some ferocious bed-bugs. Those blood sucking mites, savaged me for a few nights in a row. Luckily for Mumbai we have to go back there so it will get a chance to redeem itself.
We kept heading north and to begin with the journey wasn't that crash hot for us. To start there was a rough overnight train trip to Ahmedabad in sleeper class, the most basic, where me and Rob had to share a single bunk (a long story but not something I would repeat in a hurry). Then after reading a good review of the city with its old town we discovered that prosperous Ahmedabad was also one full of traffic and virtually devoid of accessible sights. Instead of a few nights there we quickly departed after one.
Then finally after a hard week or so we made it to almost mythical Rajasthan and it was fantastic to end up in its southern jewel, Udaipur. The city is another gem by Indian standards and although it doesn't take too much looking to see some of the more undesirable elements of India in its nooks and crannies the beauty of the architecture there overwhelmingly outweighed any negatives.
Udaipur is graced by its setting around a man-made lake. Even though the water was mostly a shade of green it still was a fantastically photogenic place where sunsets are the stuff of photographers wet dreams especially when there are graceful soaring palaces to fill up the viewfinder. Then there are the palaces that take up every inch of islands in the lake. This is a place which would make a fabulous set for a movie and as we found out it has. Every night we were treated (and then eventually annoyed) by showings of James Bond's Octopussy at the roof-top restaurants around town.
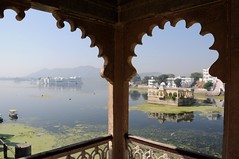
Udaipur's lake
We spent quite a lot of time wandering around the old town and its tourist orientated streets, visiting the city palace where like Mysore we filed through its small rooms and courtyards with hundreds of gawping locals and buses of foreign tour groups alike. Unlike Bond though we didn't get to a couple of locations in the film, one in particular, the lake palace, is now a very flash hotel. You can dine in the restaurant but we were held back by the fact we needed to iron our clothes first (and possibly the price).
Movie locations were one of the reasons that drove us on to the next city we visited, Jodhpur. The city starred in the film Darjeeling Limited, which had inspired us last year to get to India. Now after clambering around the city's imposing fort and getting the birds eye view of the labyrinth like old city with its Brahmin blue washed walls you could see why the old city was chosen as an extra to Owen Wilson and co. We spent a few nights there taking in the old city and superb central market with its amazing clocktower, but also trying to dodge that autorickshaw driver.
Jodhpur's fort and the old city were impressive and reason enough to get there but after now venturing further west to India's frontier desert town of Jaisalmer and immersing ourselves in its own version of ancient defences it is hard to work out which is more scenic. Jaisalmer though has foregone the blue paint and instead just devoted itself to natural sandstone so the effect of the fort's rounded bastions rising out of the old town and surrounding Thar desert is a bit like a sandcastle at one immense beach.
The old town of Jaisalmer has the added benefit though of some of the most exquisitely carved noblemen's houses or havellis you will likely see anywhere. They are rivaled only by the fort palaces for intricately carved stone lattice screens and flower features under eves that are attached with a bayonet fixture similar to a light bulb.

A Jaisalmer havelli
Jaisalmer is not just a big fairyland town in the desert it is also the home of camel safaris. A chance to escape the noise, smog, grime and yes creepy rickshaw drivers and jump instead onto farting camels and head into the peaceful, quite and very sandy desert to sleep under the stars for a few days. And that is what we have just done, but will have to wait until the next update. Coming sooner than the last I promise.
Mysore was a standout town for us and India; it was actually fairly clean and livable. There were large boulevards to walk down and a brilliant market to explore, and then there was its fabulous palace, built only a hundred years ago, but quite impressive. After trying to sneak in with our camera (they were banned) we joined the hundreds of locals in marveling at its magnificent rooms.
Our time in Mysore also coincided with the start of the India's major festival period; Diwali, the festival of lights. We have since christened it the never-ending Diwali as it has followed us like that autorickshaw. The festival would be great if it was just the fireworks but as it turns out it also involves kids igniting fire crackers - the exploding, banging kind.
There doesn't seem to be any regulation on the size of bang either. Sitting and trying to have an evening meal while an explosion rocks you and the buildings around is not much fun – especially in a country that has active terrorism. But that is just a minor complaint and since Mysore the sights we have seen more than make up for the long travel or kids risking their fingers.
Firstly there was Hampi a boulder strewn region that once contained a capital city of an abandoned empire. The inhabitants were prodigious carvers and with the masses of material scattered around turned it all into an amazing rock city. Wandering around giant boulders to the forgotten temples and bazaars was one of the highlights for our trip in the south. Seeing as we almost did not have time to get there the experience was doubly magical.
Boulder strewn Hampi
Hampi was a highlight, so was Mysore, and then there was Bombay, our next stop. We came all the way from the south, clocking up those kilometres, to the big financial smokey town to meet Rob's sister. She had come all the way from Oz to meet us (bless her, someone who actually wants to travel with us for a month). We were going further north to where we hadn't been yet (it still hard to believe how big and varied this country is) and she was happily coming along for the ride.
The colonial architecture of the graceful buildings and busy bustling thoroughfares of Mumbai was our first shared experience. Unfortunately for me it was tainted by the expense of the place and is now also viewed through a bed bug riddled prism. Due to the cost of getting a room we ended up crashing at the cheapest place we found, the Salvos. God bless them, they provide cheapish rooms but they also came with some ferocious bed-bugs. Those blood sucking mites, savaged me for a few nights in a row. Luckily for Mumbai we have to go back there so it will get a chance to redeem itself.
We kept heading north and to begin with the journey wasn't that crash hot for us. To start there was a rough overnight train trip to Ahmedabad in sleeper class, the most basic, where me and Rob had to share a single bunk (a long story but not something I would repeat in a hurry). Then after reading a good review of the city with its old town we discovered that prosperous Ahmedabad was also one full of traffic and virtually devoid of accessible sights. Instead of a few nights there we quickly departed after one.
Then finally after a hard week or so we made it to almost mythical Rajasthan and it was fantastic to end up in its southern jewel, Udaipur. The city is another gem by Indian standards and although it doesn't take too much looking to see some of the more undesirable elements of India in its nooks and crannies the beauty of the architecture there overwhelmingly outweighed any negatives.
Udaipur is graced by its setting around a man-made lake. Even though the water was mostly a shade of green it still was a fantastically photogenic place where sunsets are the stuff of photographers wet dreams especially when there are graceful soaring palaces to fill up the viewfinder. Then there are the palaces that take up every inch of islands in the lake. This is a place which would make a fabulous set for a movie and as we found out it has. Every night we were treated (and then eventually annoyed) by showings of James Bond's Octopussy at the roof-top restaurants around town.
Udaipur's lake
We spent quite a lot of time wandering around the old town and its tourist orientated streets, visiting the city palace where like Mysore we filed through its small rooms and courtyards with hundreds of gawping locals and buses of foreign tour groups alike. Unlike Bond though we didn't get to a couple of locations in the film, one in particular, the lake palace, is now a very flash hotel. You can dine in the restaurant but we were held back by the fact we needed to iron our clothes first (and possibly the price).
Movie locations were one of the reasons that drove us on to the next city we visited, Jodhpur. The city starred in the film Darjeeling Limited, which had inspired us last year to get to India. Now after clambering around the city's imposing fort and getting the birds eye view of the labyrinth like old city with its Brahmin blue washed walls you could see why the old city was chosen as an extra to Owen Wilson and co. We spent a few nights there taking in the old city and superb central market with its amazing clocktower, but also trying to dodge that autorickshaw driver.
Jodhpur's fort and the old city were impressive and reason enough to get there but after now venturing further west to India's frontier desert town of Jaisalmer and immersing ourselves in its own version of ancient defences it is hard to work out which is more scenic. Jaisalmer though has foregone the blue paint and instead just devoted itself to natural sandstone so the effect of the fort's rounded bastions rising out of the old town and surrounding Thar desert is a bit like a sandcastle at one immense beach.
The old town of Jaisalmer has the added benefit though of some of the most exquisitely carved noblemen's houses or havellis you will likely see anywhere. They are rivaled only by the fort palaces for intricately carved stone lattice screens and flower features under eves that are attached with a bayonet fixture similar to a light bulb.
A Jaisalmer havelli
Jaisalmer is not just a big fairyland town in the desert it is also the home of camel safaris. A chance to escape the noise, smog, grime and yes creepy rickshaw drivers and jump instead onto farting camels and head into the peaceful, quite and very sandy desert to sleep under the stars for a few days. And that is what we have just done, but will have to wait until the next update. Coming sooner than the last I promise.
Subscribe to:
Posts (Atom)